
If you asked my opinion on WordPress, I would tell you I prefer to work with just about any other technology. In many cases where WordPress is used, I often find things misconfigured and set up insecurely. The plugins installed are frequently never used or, worse, never updated.
WordPress has its place, though. For these instances, I’ll show you how to set up WordPress on Ubuntu 22.04 with Nginx and MariaDB.
This build is for a local install to showcase themes to someone I know. It won’t touch the internet. Further measures should be taken to secure WordPress and the OS, depending on your requirements.
Prerequisites
To follow this tutorial, you will need sudo access to an Ubuntu 22.04 installation. You can use any hypervisor, bare metal, or cloud option. For this demo, I’ll be using Hyper-V on Windows 11 Pro. For more on how to install Hyper-V on Windows, follow this guide here. I used the quick create feature on Hyper-V for the Ubuntu image.
Tip:
- If you’re not a fan of Ubuntu, any Debian-based OS should work with this guide.
- I use vi or vim for my text editor. You can use any text-based editor. Just know that vim is better. /s Learn how to use vim here: https://vim-adventures.com/
To run WordPress, we will install the following three major components:
- Nginx web server
- MariaDB/MySQL database engine
- PHP - a server-side scripting language
Update the OS
To ensure your sanity, I always recommend updating your freshly installed Opertating System. The following command can accomplish this.
1
sudo apt update && sudo apt upgrade -y
The above command updates apt’s repos and then updates the system.

Install Nginx
Next, we will install Nginx using the following command.
1
sudo apt install nginx
Start Nginx for the first time.
1
systemctl start nginx
We want Nginx to auto-start at boot time. To make that so, run this.
1
sudo systemctl enable nginx
You can verify Nginx is running with the following command.
1
sudo systemctl status nginx

You can verify by typing 127.0.0.1 or localhost in Ubuntu’s browser address bar. If this installation is remote, you can also type the server’s IP address into your address bar. Remember, localhost is the local IP of the OS you’re on. You can’t start Nginx on your VM at your hosting provider and connect with your phone using localhost because you’re calling the phone’s localhost.

Make www-data (Nginx user) the owner of the web directory. By default, it’s owned by the root user.
1
sudo chown www-data:www-data /usr/share/nginx/html -R
Install MariaDB
MariaDB is a community-developed fork of MySQL. It was forked due to concerns from the Oracle acquisition in 2009. MariaDB is generally considered a drop-in replacement for MySQL.
Install MariaDB with this command.
1
sudo apt install mariadb-server mariadb-client
Check that MariaDB is running with the following command. It should auto-start by default.
1
systemctl status mariadb

Let’s secure MariaDB. By default, several features are exposed or loosely configured. MariaDB and MySQL include a quick setup script that applies some basic security.
1
sudo mysql_secure_installation

Install PHP
I believe these are the minimum required packages for WordPress, but I’d love to be told otherwise. In any case, some of these packages have dependencies that will install other packages. That’s fine. Depending on what plugins you install, you might need additional packages, too.
Install PHP with the following.
1
sudo apt install php php-fpm php-gd php-curl php-mbstring php-xml php-mysql php-xmlrpc php-zip php-cli
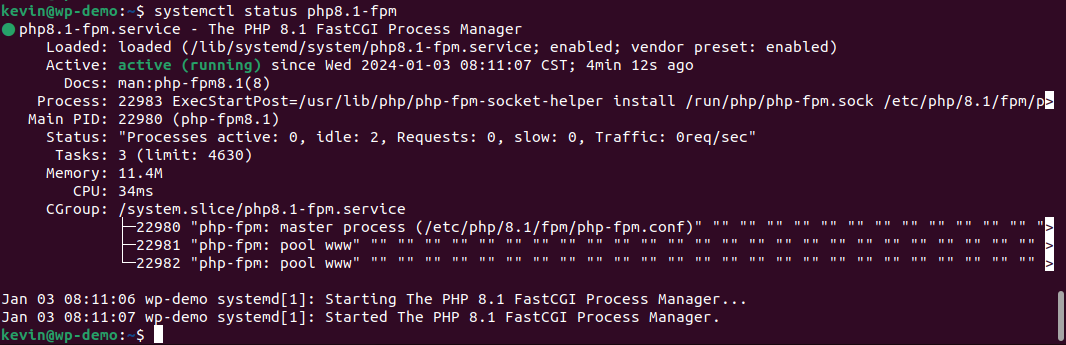
Check that PHP is running with the following.
1
systemctl status php8.1-fpm
Let’s setup our first site. Since this is a demo local to my laptop, I’m using a non-registered domain (northstar24.xyz). I’m accomplishing this by editing my hosts files. I’ll cover that in a moment.
You can copy an existing site or use the template below. To get started, edit your site file with the following.
1
sudo vi /etc/nginx/sites-available/northstar24.xyz
Below is a basic HTTP service configuration. If you plan to take this into production (aka, live on the internet), I recommend enabling HTTPS. You can do this easily with certbot from https://certbot.eff.org. Another option would be to use Cloudflare SSL/TLS. If you go with Cloudflare, I’d recommend you look at mTLS too.
1
2
3
4
5
6
7
8
9
10
11
12
13
14
15
16
17
18
19
server {
        listen 80;
        root /var/www/html/;
        index index.php index.html index.htm index.nginx-debian.html;
        server_name northstar24.xyz;

        location / {
                try_files $uri $uri/ =404;
        }

        location ~ \.php$ {
                include snippets/fastcgi-php.conf;
                fastcgi_pass unix:/var/run/php/php8.1-fpm.sock;
        }

        location ~ /\.ht {
                deny all;
        }
}
Enable the site with the following command.
1
sudo ln -s /etc/nginx/sites-available/northstar24.xyz /etc/nginx/sites-enabled/
Reload Nginx to apply the new configuration.
1
sudo systemctl reload nginx
Let’s check to ensure PHP is running. Create a new file in the html directory.
1
sudo vi /var/www/html/info.php
Add this to the file.
1
<?php phpinfo(); ?>
Let’s edit the hosts file to point the browser to the fake domain I used above. I’m editing the Ubuntu install because I’m using the browser on the virtual machine. The Windows hosts file is found in the following folder: “C:\Windows\System32\drivers\etc”
1
sudo vi /etc/hosts

Note:
In full disclosure, something went wrong with my installation. When I typed this guide up, I had already blown away the VM I used here. My thought is one of the PHP packages brought in Apache. I’m not positive, as I didn’t grab a screenshot of everything I did. If Apache is installed for you, too, you can remove it with the following command.
You should restart Nginx after this.
At this point, you should be able to put your URL in the browser and point to the info.php file. This will validate that PHP is installed and running as it should be.
1
http://northstar24.xyz/info.php
You’re on the right road if you get a page like this.

Minor issue, PHP defaults to a very conservative 128M of RAM. WordPress is hungry for RAM. Let’s give it some more. Edit the following.
1
sudo vi /etc/php/8.1/fpm/conf.d/98-custom.ini
Adjust your limits as needed; I used the following.
1
2
3
4
5
6
7
8
9
10
11
12
13
14
; Maximum amount of memory a script may consume. Default is 128M
memory_limit = 512M

; Maximum allowed size for uploaded files. Default is 2M.
upload_max_filesize = 20M

; Maximum size of POST data that PHP will accept. Default is 2M.
post_max_size = 20M

; The OPcache shared memory storage size. Default is 128
opcache.memory_consumption=256

; The amount of memory for interned strings in Mbytes. Default is 8.
opcache.interned_strings_buffer=32
Restart PHP to apply the changes.
1
sudo systemctl reload php8.1-fpm
Verify memory limits increased.

Danger:
Delete the PHP info file!
Seriously, you don’t need that data exposed to the world.
Install WordPress
Download WordPress with the following command.
1
wget https://wordpress.org/latest.zip

Extract the files to the html directory.
1
sudo unzip latest.zip -d /var/www/html/
You can also put several WordPress sites on one server. To accomplish this, create a directory for each site.
1
sudo mv /var/www/html/wordpress/ /var/www/html/northstar24.xyz
Edit your Nginx config to use the new location.
1
sudo vi /etc/nginx/sites-available/northstar24.xyz
Change the line that looks like this:
1
/var/www/html
To look like this:
1
/var/www/html/northstar24.xyz

Restart Nginx.
1
sudo systemctl reload nginx
Database
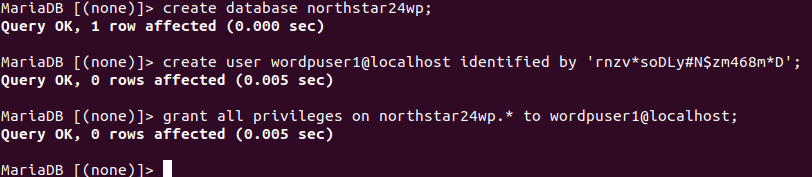
Log into the MariaDB console as root with the following command.
1
sudo mariadb -u root
or
1
sudo mysql -u root
Create a database for WordPress using the following command. I used wordpress, but you can use whatever you prefer. If this were production, I would create a database with random characters like xKQfM7277LUN-northstar24.xyz. Is this necessary? Probably not. It makes me feel all warm and fuzzy inside, though.
Don’t forget the “;” semicolon when working with SQL.
1
create database wordpress;
An example might look like:
1
create database northstar24wp;
Replace wordpuser1 and the-password with your preferred username and password. Again, I’d use random characters here too.
1
create user wordpuser1@localhost identified by 'the-password';
Another example might look like:
1
create user ncd8gaRuiUnRt7bz2E@localhost identified by 'rnzv*soDLy#N$zm468m*D';
Grant permissions to the user account you created.
1
grant all privileges on wordpress.* to wordpuser1@localhost;
Flush the privileges table for the changes to take effect and exit.
1
2
3
flush privileges;

exit;
Setup WordPress
Let’s get WordPress set up!
1
cd /var/www/html/northstar24.xyz
Copy the sample config file to get started.
1
sudo cp wp-config-sample.php wp-config.php
Generate unique keys and salts at this URL https://api.wordpress.org/secret-key/1.1/salt/
1
sudo vi wp-config.php
Edit the following lines.
1
2
3
4
5
6
7
8
9
10
11
12
13
14
15
16
17
18
19
20
/** The name of the database for WordPress */
define( 'DB_NAME', 'database_name_here' );

/** Database username */
define( 'DB_USER', 'username_here' );

/** Database password */
define( 'DB_PASSWORD', 'password_here' );

define( 'AUTH_KEY',         'put your unique phrase here' );
define( 'SECURE_AUTH_KEY',  'put your unique phrase here' );
define( 'LOGGED_IN_KEY',    'put your unique phrase here' );
define( 'NONCE_KEY',        'put your unique phrase here' );
define( 'AUTH_SALT',        'put your unique phrase here' );
define( 'SECURE_AUTH_SALT', 'put your unique phrase here' );
define( 'LOGGED_IN_SALT',   'put your unique phrase here' );
define( 'NONCE_SALT',       'put your unique phrase here' );

/** MySQL table prefix */
$table_prefix = 'wp_';
Here is what I used for this instance.
1
2
3
4
5
6
7
8
9
10
11
12
13
14
15
16
17
18
19
20
/** The name of the database for WordPress */
define( 'DB_NAME', 'northstar24wp' );

/** Database username */
define( 'DB_USER', 'wordpuser1' );

/** Database password */
define( 'DB_PASSWORD', 'rnzv*soDLy#N$zm468m*D' );

define('AUTH_KEY',         'DVwP=%~V:TU^+bj<$k)des|AyAc.[rWtEOqS2H,dOe6~+COL^V!)k.P?D$(hVb|-');
define('SECURE_AUTH_KEY',  'L20wrx(%^$~()evqY*=/Jb$+I;OHZ,x1qy#L8(WXI1d;mq /o.=U14}Xz3ZEDcJk');
define('LOGGED_IN_KEY',    'O(Fl#G%-:=BXjOm>-$FyOj:5|u!^o> -vgR=)#3gX(|=6-{_`w`<cH4_V _SpWKO');
define('NONCE_KEY',        '@|H7ba;]2ZDMk6+^+eh{F?2#aPqhDp%B+um3%*@J=F7?uM>g|tE]=,YXU62hrsJp');
define('AUTH_SALT',        'oX+b|t* N^9!$?/R8f{p7B|N|(d[9Ws-OKKk&J*~I;UvM!q]<D+ymt2cy-qxte$&');
define('SECURE_AUTH_SALT', ' |O@:= tQvE[&F}r;qrsf?j5kn.Vr+L8sa[ew0G_4#tyUE-dJm|%-l b r5pYFr7');
define('LOGGED_IN_SALT',   'c.ozZT@=pR+EpAn!f,QG~GO_?vuvS]&UN>hnAQ02?|` ll:M#.|?gK++4Y&|JAM3');
define('NONCE_SALT',       '[#@u1+71V|*v Fx@Clg8EYb#eAWp~}fn[{DEHWXc2n|UmA/u)-+LishH~{uR <;1');

$table_prefix = 'wp5sRfMo_';

Set the file permissions for the config file.
1
sudo chmod 640 wp-config.php
Set the owner of your WordPress directory.
1
sudo chown www-data:www-data /var/www/html/wordpress -R
Or something like this if you have multiple sites.
1
sudo chown www-data:www-data /var/www/html/northstar24.xyz -R
Open up a web browser and navigate to the URL. Set your language.

You’re creating your user account on this page to the WordPress management panel. Don’t make this the same login as your database!
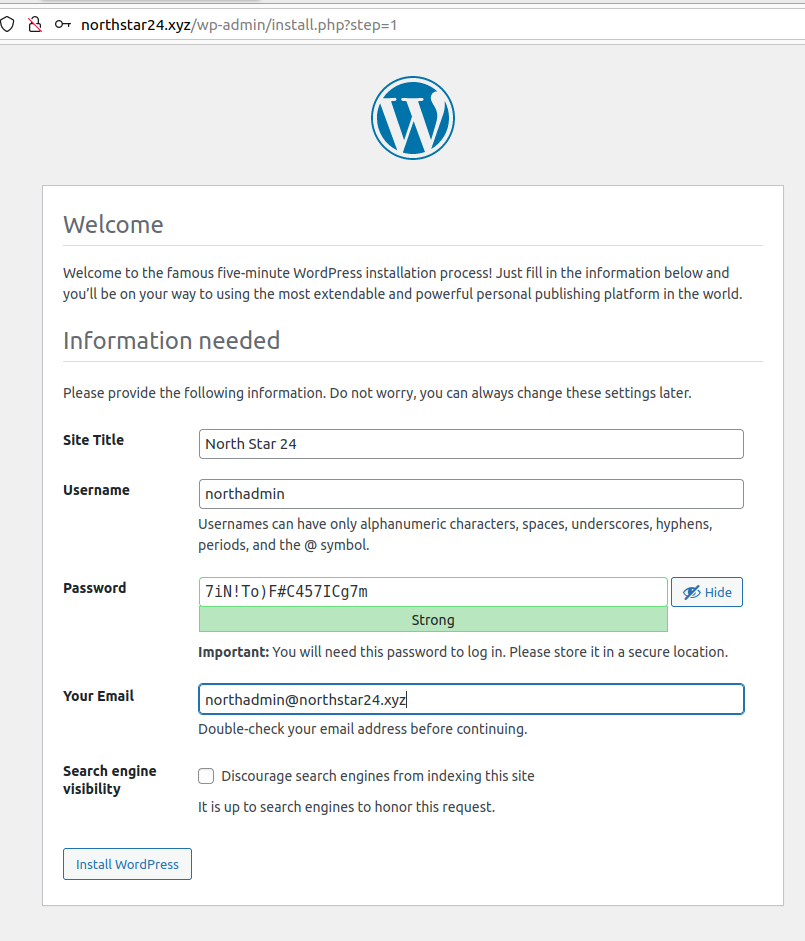
You’re finished! Login to WordPress with the user account you set up in the previous step and enjoy your new site.

Comments powered by Disqus.